React
Cypress
Cypress Intro
How Cypress enhances debuggability
Debugging code is not just an integral part of testing but programming as a whole. It helps us evaluate problems and see the cause of unexpected behavior. Cypress takes debugging to a whole new level.
When it comes to debugging in Cypress, you have the freedom to choose whether you want to debug your test cases with tools you are already familiar with or go with the Cypress way. There’s really no one way or the other, the two are enhancing each other and can be used together.
Familiar tools
By providing the tools you already know, Cypress makes the learning curve less steep. One of the most powerful features of the test runner is the built-in DevTools.
Since the test runner itself is a wrapper around your browser, you can access DevTools just like you normally would. This can help you understand what is happening in your application during your test cases. By interacting with each command, you can log useful metadata to the console.
Using the debugger
You also have the option to use the debugger keyword in case you want to stop at a certain point in your test. One thing to keep in mind though, since Cypress commands are asynchronous in nature, we need to attach the debugger in callbacks:
// ❌ Don't
cy.get('.element');
debugger; // Won't wort

// ✔️ Do
cy.get('.element').then(() => {
    debugger; // Will work
});
Cypress-specific tools
Debugg tools
Cypress has a handy .debug() command that you can use to hit a breakpoint. This yields the previous command that it is attached to. You can use it in the following way:
// Note that this time, you don't need a then clause
cy.get('.element').debug();
The pause command
You can also make Cypress pause after each command to inspect the state of your application. This lets you easily see various things, such as your DOM state, or the network traffic at each given step.
cy.pause();
cy.get('.element');
We will delve deeper into each section in the “Debugging Cypress” lesson, and we will see how to actually troubleshoot the tests we have written.
Spies, Stubs, and Clocks
First and foremost, why do we need to control some of the behaviors of our application? Wouldn’t we want to test it from a user’s perspective without modifying anything programmatically? There can be several reasons for controlling the original behavior of your app. Let’s take a look at some
Reasons for controlling behavior
When you want to modify the behavior of your application, here are a couple of scenarios that will actually make your test suite more robust:
- You want to avoid side effects, such as a bad network connection.
- You are dealing with
Promises, and you want to automatically resolve or reject them. - You want to force things to fail to test a failure path.
- You want to force things to pass to test a happy path.
- You want to speed up your test suite by shortcutting redundant steps like logging in to test your application.
These are just some of the reasons for modifying behavior. There are others as well. We will take a look at them shortly.
Now let’s take a look at some ways to help with the above-mentioned points.
Stubbing functions
The most common way to modify a function’s behavior is by using stubs. They are most commonly used in unit tests, but they can still be useful for some cases in integration or end-to-end testing. You can stub functions using the cy.stub command
// Replace user.get() with a stubbed function
user.get = cy.stub();
cy.stub(user, 'get');
The two examples above are equivalent. You can also force functions to have a return value of your choice:
const user = {
  get(field) {
    return field;
  }
};

// Force user.get to return "John Doe"
cy.stub(user, 'get').returns('John Doe');

// Force user.get called with 'age' to return 30
cy.stub(user, 'get')
  .withArgs('age')
  .returns(30);
Apart from controlling the return values of functions, you can also control promises using the following way
// Force a promise to be resolved with a given value
cy.stub(user, 'get').resolves('John');

// Force a promise to be rejected with a given error
cy.stub(user, 'get').rejects(new Error('User does not exist.'))
Spying on functions
In other cases, you may not want to modify the behavior of your functions, but you are still interested in them.
For example, you want to test whether they were called, if they were called with the right arguments, or how many times they were called. This is where spies are useful. You can spy on a function in the following ways:
// Spy on the user.get() method
const spy = cy.spy(user, 'get');

// Test whether the function was called
expect(spy).to.be.called;
For assertions, anything can be used that is supported by Sinon-Chai or Jest:
- expect(spy).to.have.calledOnce
- expect(spy).toHaveBeenCalled()
Controlling date and time
Last but not least, you may run into a case where you want to control the date and time of your application to avoid slow tests. Luckily for us, this can also be achieved with clocks. Using the cy.clock command, you can control Date objects, the global setTimeout method, and setInterval.
For example, you may have a setTimeout set to 1000ms that you want to invoke. You can do it in the following way:
describe('Time', () => {
    it('Should tick the timer', () => {
        cy.clock();
        cy.visit('https://google.com');

        // Invoke `setTimeout`
        setTimeout(() => {
            console.log('I will be logged to the console instantly.');
        }, 5000);

        cy.tick(5000); // Tick time ahead by 5000ms
    });
});
cy.clock();
cy.visit('http://localhost:8080');

// Invoke function that uses `setTimeout`
funtionWithSetTimeout();

cy.tick(1000); // Tick time ahead by 1000ms
Note that to use
cy.tick, you have to set up a clock first, usingcy.clock, and it must be called before you visit your application by usingcy.visit.
// You can use both ways to restore a clock
cy.clock().invoke('restore');
cy.clock().then(clock => clock.restore());
Proplems while testing:
Half-loaded page
One of the most common causes of flakey tests is caused by a half-loaded application state. Your app is still waiting to be fully ready to be interactive, but your test suite already tries to verify test cases without waiting for the load event to finish.
In the case of dynamic content, things are even more pronounced. This can cause the test suite to interact with non-existent elements and result in a failed test. Even though the element is working properly, it only needs more time to load.
Animations
Animations provide great visual feedback for users about what is happening on the page. They guide the user’s vision to key elements and can make your overall user experience better. On the other hand, they can often cause test cases to fail.
Cypress tries to get around this by waiting for elements to stop animating. To calculate whether the element is animated, Cypress checks the current and previous positions of the element. If the distance exceeds a threshold, the element is considered to be animated.
You can increase or decrease this threshold using the configuration file, or you can turn it off entirely if you don’t need it.
// Configuring animations in cypress.json
// The default values for threshold and wait for animations
{
  "animationDistanceThreshold": 5,
  "waitForAnimations": true
}
Luckily for us, we don’t have to manually deal with animations inside the test cases. Cypress handles everything automatically for us.
Invisible elements
Invisible or even non-existent elements are another cause of flakey tests. Cypress does a lot of calculations to determine whether an element is visible or not. For example, it checks various CSS properties, such as the elements (or the ancestors) width and height, whether their display is set to none, or visibility is set to hidden. There are other factors that go into the calculation as well, but the basic idea is around looking at CSS properties.
Disabled elements
Interacting with disabled elements can also cause issues. Cypress verifies whether an element is disabled by checking if its disabled property is set to true.
Covered inputs
Lastly, covered inputs can also cause headaches. Imagine all of your tests are green. But in reality, the whole page is covered by a popup that cannot be closed. Real users will have a hard time interacting with your page, and you want to know about that.
Like for animations, we don’t have to do anything special to cater to invisible, disabled, or covered elements. All of this is handled automatically and internally by Cypress.
Apart from the previously mentioned points, you can also manually troubleshoot flakey tests or even speed up your test cases by forcing interactions. To force an event to happen, you have to pass force: true to an event:
// Pass force: true if you want to force a command
cy.get('button').click({ force: true });
This will tell Cypress not to perform the above-mentioned steps such as:
- Scrolling the element into the viewport.
- Checking if the element is animated.
- Checking if the element is visible.
- Checking if the element is not disabled.
- Checking if the element is covered. And so on.
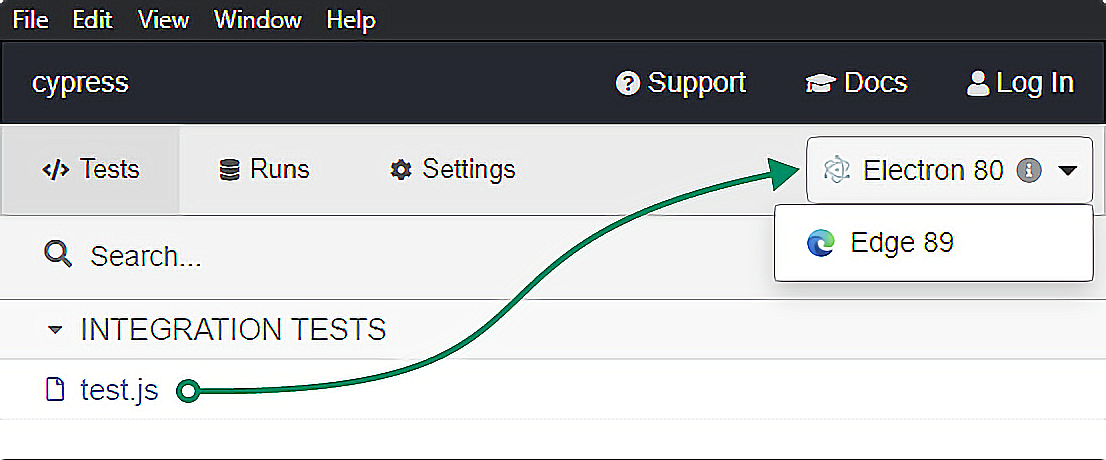
Selecting browsers through the test runner
Cypress has the ability to run your test cases in multiple browsers. Currently, it supports Chromium-based browsers, such as Electron, Chrome, Firefox, and Edge.
Others such as IE or Safari are currently unsupported. You can read about their roadmap regarding cross-browser support on GitHub.
Apart from Electron, any browser that you want to use to run your test cases needs to be installed locally or in your CI environment.
Once your browsers are ready, you can find and switch between them in your test runner in the upper-right corner.
You can also execute your whole test suite in a given browser, using the --browser flag through the CLI. For example, you can set up the following scripts in your package.json file to use them in your pipeline and verify your test cases in multiple browsers:
{
  ...
    "scripts": {
        "cypress:run:chrome": "cypress run --browser chrome",
        "cypress:run:firefox": "cypress run --browser firefox",
    }
}
Running specific tests in different browsers
Cypress also provides the ability to run specific test cases in different browsers. For example, you know a certain part of your application is prone to malfunction in Firefox. Then, you can specify this in your test case:
describe('Feature works property on Firefox', { browser: 'firefox' }, () => {
    it('...');
    it('...');
})

// You can also pass this to an `it` call
it('Should work properly in Chrome', { browser: 'chrome' }, () => { ... });
Fixtures and Integration
When you create a test suite for a web application, you often have to think about what happens when a network connection fails. Any function that relies on fetching data from a server or requires sending data to the server has side effects. And side effects can easily break tests.
Our network request can come back either successfully or with a failure, or anything in between. There are just too many status codes to keep in mind. To work around this, Cypress introduces a folder called fixtures.
What are fixtures
Fixtures are pieces of static data that can be used inside your test cases whenever you need to stub a network request.
This way, you can eliminate any side effects, and ensure that your test cases are deterministic. You can also use them to match your data against a fixed set without cluttering your actual test cases.
How to configure fixtures
Let’s take the example of a user login. You have a test user for the purpose of testing your whole application, which is behind a login screen. You want to login in first, but you also want to make sure that the server always responds with a 200 status code. Take the successful response you get, and create a new file inside your fixtures folder called login.json:
{
    "userId": 1,
    "token": "qrViFRJuHepMpvneaKJvdyGfsdmBW6"
}
You can configure fixtures this way:
- Take the successful (or unsuccessful in case you want to test a failure path) response from the server.
- Create a new json file with the response under your fixtures folder.
How to use fixtures
In order to use these static data inside your test cases, you can use the cy.fixture command like so:
cy.fixture(filePath); // Load the static data from the location
cy.fixture('login'); // Loads data from "fixtures/login.json"
{
  "name": "John Doe",
  "age": 30
}
cy.fixture('user').then(userData => {
  // You can access the contents of the fixture with `userData`
  console.log('userData is:', userData);
});
You can also use this fixture in combination with cy.intercept to deterministically test different parts of your application that rely on network requests that are known to come back with various responses
it('should log the user in', () => {
  cy.intercept('/login', { fixture: 'login.json' }, request => {
    cy.url().should('include', 'dashboard');
  });
});
Integration
The purpose of the integration folder is to group all of our test cases into one single place. By default, all of our test files will be located under this folder: Cypress also automatically creates an examples folder inside it with example test cases, so we can look around at how common scenarios can be solved.
Configuring tests
However, like most other things, this can also be configured. If you would like to put your test files elsewhere, you can configure the integrationFolder property in your cypress.json file:
{
  // By default, it is pointing to the `integration` folder inside `cypress`
  "integrationFolder": "cypress/integration"
}
You can choose whether you want to write your test cases in vanilla JavaScript, .jsx, .coffee, or .cjsx. It’s completely up to you. Cypress supports all of them.
It also comes with support for ES2015 and CommonJS modules out of the box, which means we can use require or import statements to pull in our packages without any additional setups.
Plugins and Support
Plugins in Cypress help you to tap into the internal workings of the framework and modify it according to your own taste. It lets you execute code at various stages of the Cypress lifecycle.
The plugins folder comes with a single index.js file by default. This is what Cypress will automatically look for when loading in plugins.
Of course, if you want to customize your project structure to your own needs, you can do that through your cypress.json configuration file:
{
    // The default location of the plugins file
    "pluginsFile": "cypress/plugins/index.js"
}
Configuration
The most common way to use plugins is to configure your environment programmatically. This lets you do things like:
- Use different configurations for different environments
- Modify your Cypress configuration values
If you have a look into your default plugin file, you will notice that it exports a module with two arguments: on and config:
module.exports = (on, config) => {
    console.log('Your Cypress config', config);

    config.env.NODE_ENV = 'development';

    return config;
};
Using the config argument, you can access your whole configuration object that you can alter to your own needs. Don’t forget to return the config object at the end of the export; otherwise, the modifications will not take effect.
Using preprocessors
We’ve seen the purpose of the config argument. But there is also an on that we can use. What exactly is that?
This is a function that helps you hook into lifecycle events. If you’re dealing with a robust build system and you also have transpilers in place (such as TypeScript), this is where you can:
- Customize your TypeScript compile.
- Customize Babel settings.
- Customize your build process.
- Add support for ES features.
To do all of this, you have to hook into the file:preprocessor event:
module.exports = (on, config) => {
    on('file:preprocessor', callback);
};
Lifecycles
You can tap into other lifecycle events to further customize the behavior of your test suite. Using the on function, you can access the following:
module.exports = (on, config) => {
    // Run before and after your test suite
    on('before:run', callback);
    on('after:run', callback);

    // Run before and after a single spec file
    on('before:spec', callback);
    on('after:spec', callback);

    // Run after a screenshot has been taken
    on('after:screenshot', callback);

    // Modify the launch arguments of your browser
    on('before:browser:launch', callback);
};
Defining tasks
You can also define custom tasks to execute any code in a Node environment that otherwise would not be possible inside the browser. These tasks can be used in conjunction with the cy.task command inside your tests:
Installing new plugins
If you don’t want to allocate too much time to configuring plugins, Cypress also maintains a list of existing plugins created by the dev team and the community that you can simply npm install using the following command:
How support works
We’ve seen what fixtures, integration, and plugins can do for us, but there’s still one folder left we need to talk about, and that is called support.
By default, your support folder will come with two files: index.js and commands.js. If you look into index.js, you will see it only has one purpose: to aggregate other files:
// By default this is the only line that is executed in the index file
import './commands'
And commands.js can hold your custom Cypress commands that you can run during your test cases:
// Custom Cypress commands
cy.login(user);
cy.filter(products);
cy.validate(input);
Cypress will automatically include your support file. By default, it will look for an index.js inside the support folder. If you don’t have this file or you simply want to place it elsewhere, you can configure it using your cypress.json:
{
    // The default location of the support file
    "supportFile": "cypress/support/index.js"
}
This file runs before your spec files. However, if you execute all specs in your test runner, it will only execute the code once (before all spec files) instead of executing it before each spec.
The files are executed in the following order:
<!-- The support file gets executed first -->
<script src="support/index.js"></script>

<!-- Your spec files gets executed after -->
<script src="integration/first-spec.js"></script>
<script src="integration/second-spec.js"></script>
<script src="integration/third-spec.js"></script>
Creating custom commands
To create a new custom command inside your commands.js file, you can use the following API:
Cypress.Commands.add(name, callback);
For example, you may have to log a user in to test your application. For this, you can create a custom login command in the following way:
Cypress.Commands.add('login', user => {
    // You can use the user object here to programmatically log in the passed user.
});
You can also use built-in Cypress commands inside the callback function to verify your UI:
Cypress.Commands.add('logout', () => {
    cy.get('.login').should('not.exist');
    cy.get('.logout').click();
});
In your spec files, you can call these commands like you would call any other:
cy.login(user);
cy.logout();
Creating overwrites
To create an overwrite using your command.js, we can use the following API:
Cypress.Commands.overwrite(name, callback);
For the name argument, we want to pass the name of the Cypress command that we want to overwrite. But for the callback function, we need to provide a couple of arguments, depending on the command we want to overwrite:
- originalFunction: The original existing function that we want to overwrite. We need to call this at the end of the callback.
- options: Custom options passed to the command. We can pass this down to the originalFunction to modify its behavior.
For example, we can use the below custom overwrite to select elements with a dollar sign that translates to a [data-testid] attribute selector.
Cypress.Commands.overwrite('get', (originalFunction, selector) => {
    if (selector.startsWith('$')) {
        selector = `[data-testid="${selector.substring(1)}"]`;
    }

    // Make sure you return the original function at the end of your overwrite.
    return originalFunction(selector);
});
Then we can use this overwrite in our spec files, to select elements based on our custom selector:
// This will be equivalent to saying
// cy.get('[data-testid="banner"]');
cy.get('$banner');
cy.get('[data-testid="banner"]');
Configuration
To make Cypress work exactly as we want, it provides various options to tailor the test runner as well as the behavior of our test cases to our own needs. Let’s take a look at what the available options are and the most common ways to configure Cypress.
Configuring through cypress.json
As we have seen previously, Cypress automatically creates a cypress.json file the very first time we set up Cypress. This is where we can define custom configurations for Cypress in one place, such as where we want Cypress to look for the different files we have:
// Cypress-related folders with their default values
{
    "fixturesFolder": "cypress/fixtures",
    "integrationFolder": "cypress/integration",
    "pluginsFile": "cypress/plugins/index.js",
    // ... and so on
}
Not only folder locations can be configured, but also global setups, such as a baseUrl or an env object containing environment variables, as well as many flags for setting up how different commands should behave inside Cypress. For the full list of available options, you can refer to the official documentation.
Configuring through CLI
We can also pass options directly to the command that we run through the command-line interface using the --config flag. If you need to set anything differently for your CI (that does not affect the overall result of your test cases) such as the location of the generated screenshots/videos, you can set up a different command for your package.json that runs the CI version of Cypress:
cypress run --config screenshotsFolder=screenshots/location/override
We can also use a specific browser through the CLI for which we want to execute the tests, using the --browser flag:
cypress run --browser firefox
Configuring for individual test cases
We also have the option to configure spec files differently. This comes in handy when the test requires different setups, such as a different viewport or base URL. To pass a different configuration to a spec file, we can use the Cypress.config call:
Cypress.config('viewportWidth', 1000);
Cypress.config('viewportHeight', 660);
This accepts a config key as a string and its paired value. Note that every configuration option can be changed, as some are read-only. Anything that is not under Cypress’s control will be ignored if you try to set it. The full list of config options that can be set is defined in the documentation.
Apart from the methods mentioned above, we can also configure Cypress through plugins, as discussed in the previous lessons.
Organizing Your Tests
In the Fixtures and Integration lesson, we talked shortly about different ways to organize your test files:
- Organizing by functionality
- Organizing by components
- Organizing by different pages (what we will follow in this course)
- Organizing until you feel comfortable with the setup
In this lesson, however, we will look into how to organize individual spec files. You will be introduced to an approach that is easy to implement, yet powerful.
It massively improves the readability of your test cases while also making them more easily reusable throughout your application.
This approach organizes test cases into different steps.
Organizing tests into different steps
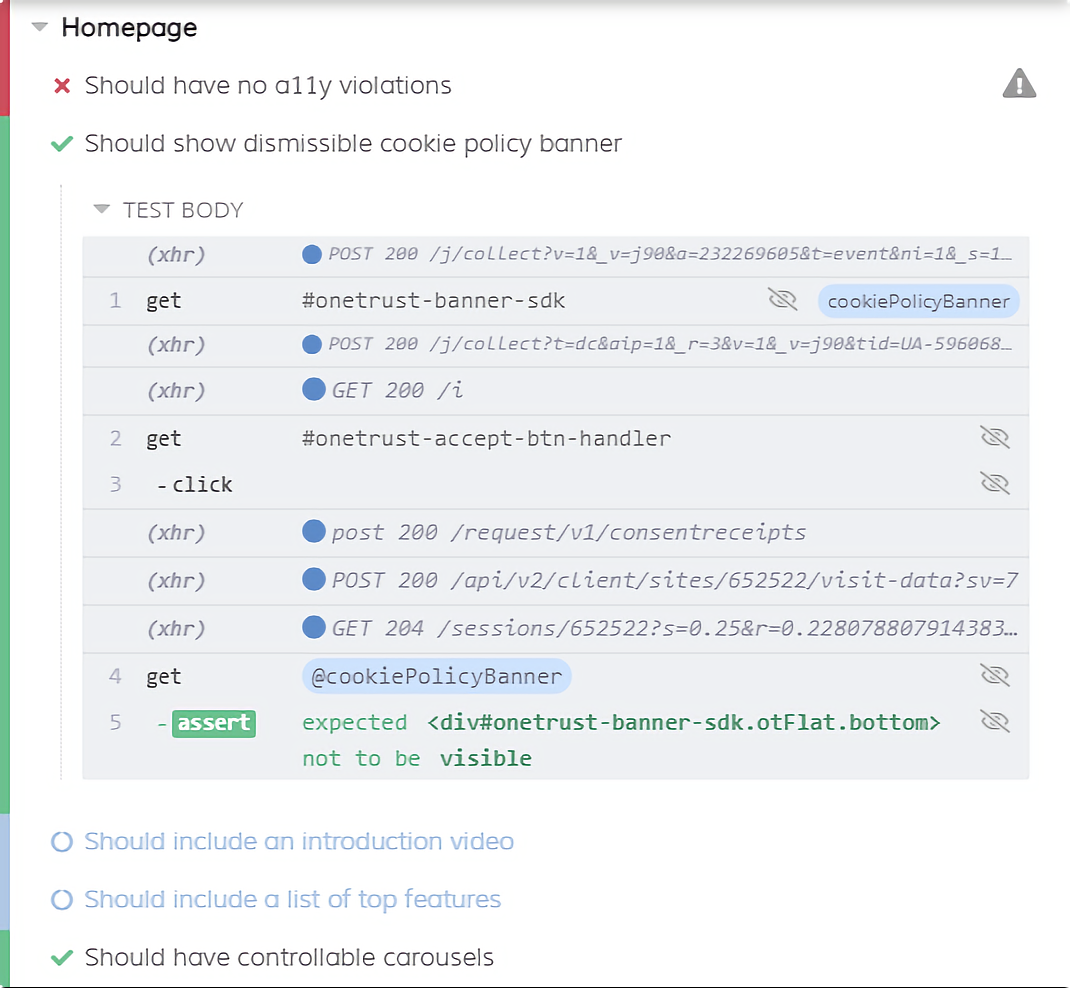
As discussed earlier, we will demonstrate the power of Cypress through testing its own website, cypress.io. Let’s say we want to start with the home page and verify the following things:
- The cookie policy banner appears as expected.
- The video and the features section are available on the page.
- The carousels are working as expected.
For this, we would have a file in the integration folder called home.js that has the following test cases
describe('Homepage', () => {
    it('Should show dismissible cooke policy banner', () => {

    });

    it('Should include an introduction video', () => {

    });

    it('Should include a list of top features', () => {

    });

    it('Should have controllable carousels', () => {

    });
});
Inside the callback function of each it case, we can write our actual verifications. But to make each test more understandable, we can break out each verification into named steps using function exports-imports
import {
    verifyCarouselPresence,
    clickOnNextButton,
    clickOnPreviousButton
} from '../steps/carousel'

describe('Homepage', () => {
    it('Should have controllable carousels', () => {
        verifyCarouselPresence();
        clickOnNextButton();
        clickOnPreviousButton();
    });
});
At a quick glance, we can clearly see what the test is supposed to do:
- Verify whether the carousel is present
- Try to navigate it using the next button
- Try to navigate it using the previous button
For these functions, we can create a separate directory inside our cypress folder called steps, where we can group different steps together based on common functionality:
export const verifyCarouselPresence = () => {
    // Cypress commands for verifications
    cy.log('Verify that carousel is present.');
};

export const clickOnNextButton = () => {
    cy.log('Click on the next button in the carousel.');
};

export const clickOnPreviousButton = () => {
    cy.log('Click on the previous button in the carousel.');
};
For example, we can create a carousel.js for carousel-related functionality that exports the above functions.
Interacting with Elements
The most basic building blocks of a test are selectors. In our test cases, we select elements for two main reasons:
- Verify their presence.
- Interact with them.
There are many different ways to query and then interact with elements in Cypress. In this lesson, we will look into the most commonly used selectors and Cypress commands to interact with these selected elements.
Selecting elements
When we want to select an element in Cypress, we will need to use the cy.get command.
We’ve looked into selecting elements in the previous lesson using the cy.get command. The command works in the following way:
cy.get('.class-selector');
cy.get('#id');
cy.get('[data-attribute="selector"]');
cy.get('ul > li');
The selector works similar to a jQuery selector. Essentially, you can use any selector you normally would when querying the DOM.
Interacting with selected elements
To interact with the selected elements, Cypress provides a similar interface to the DOM API.
Clicks
The most common case of interacting with elements is simply triggering a click event. You can achieve this using the .click command:
// Make sure you trigger the click event after getting the DOM element with `cy.get`
cy.get('button').click();
cy.get('button').dblclick();
cy.get('button').rightclick();
Typing
You may also want to test inputs by typing into them. For this, you can use the .type command:
cy.get('input[type="email"]').type('john@doe.com');
cy.get('input').type('{backspace}');
cy.get('input').type('{del}');
cy.get('input').type('{selectall}');
You can find the full list of available special characters inside the official documentation of Cypress.
In case you need to test whether your input fields can be cleared from values, you can also use the .clear command. It essentially empties an input field so it returns into its initial state:
// The two are equivalent
cy.get('input[type="email"]').clear();
cy.get('input[type="email"]').type('{selectall}{backspace}');
Checks
Checking and unchecking checkboxes is just as easy with the .check and .uncheck commands:
cy.get('[type="checkbox"]').check();
cy.get('[type="checkbox"]').uncheck();
Select
Cypress also provides the possibility of interacting with select elements, using the .select command:
// You need to pass either the value or the text content of the `option` you want to select.
cy.get('select').select('value');
Trigger
Lastly, we have .trigger. You can use .trigger to trigger DOM events. Any event that you can trigger on a DOM element is a valid argument for .trigger:
cy.get('button').trigger('click');
cy.get('area').trigger('mouseover');
cy.get('input').trigger('keyup');
Dismissing the cookie policy
To practice everything we’ve discussed in this lesson so far, let’s write a simple test case for dismissing the cookie policy on the home page. We’ve already created an empty it block for it. let’s also add a couple of steps:
import {
    verifyCookiePolicyPresence,
    dismissCookiePolicy
} from '../steps/cookiePolicy'

it('Should show dismissible cookie policy banner', () => {
    verifyCookiePolicyPresence();
    dismissCookiePolicy();
});
Don’t forget to create a cookiePolicy.js file inside your steps folder with the two exported function:
export const verifyCookiePolicyPresence = () => {
    ...
};

export const dismissCookiePolicy = () => {
    ...
};
First, we want to select the cookie policy, so we can verify its presence. For this, we can use cy.get:
cy.get('#onetrust-banner-sdk');
Note that you don’t need to chain anything after the .get function. By simply selecting the element, you verify its presence. If it’s not there, the test suite will fail.
If you want to be more verbose, you can chain a .should command:
cy.get('#onetrust-banner-sdk').should('exist');
After that, we need to find the button on the banner and trigger a click, then we can verify if it removed the cookie policy banner. This is what we will need to write in the dismissCookiePolicy step.
Aliasing
We’ve looked into selecting elements in the previous lesson using the cy.get command. However, there’s one problem with it.
Selectors are bound to change from time to time, and using the same selectors in different places means you have to update your test suite in multiple places to avoid flakes. This is what aliases aim to solve.
What are aliases
Aliasing selectors are a way to assign a name to an element that can be referenced for later use. This way, you only need to query using the selector once, but use the alias throughout your test multiple times. If you need to update the selector, you will only have to do it in one place.
How to create aliases
To create aliases in Cypress, we can use the .as command on an element:
cy.get('.download').as('downloadButton');
Later in your test cases, you can reference the alias by prefixing it with an @ symbol:
cy.get('@downloadButton').click();
cy.get('@downloadButton').should('be.disabled');
Referencing data attributes
To also reduce the likelihood of flakes, it’s recommended to use data attributes as selectors. These are less likely to change. For the sake of testing, you can also create custom data attributes, that you know won’t be changed in the future. A common convention is to use data-test-id or data-testid attributes.
cy.get('[data-testid="downloadButton"]');
Conditional Testing
Conditional testing can be described in this simple pseudo-code:
If A
  Do B
Else
  Do C
We usually need these kinds of tests when we want to:
- Test things differently based on the presence of an element.
- Cope with A/B testing in the background.
- Do dynamic testing based on the content of our app.
The problem with conditions in tests
There is a fundamental problem with these types of tests though. While you could easily write them, they often lead to flakey tests and random failures, making tracking these failures harder.
You can only write conditions once the state of your application has settled. But it is often impossible to know when that is, especially with highly dynamic SPAs. This instability can cause the previously mentioned random failures and flakes.
Possible solutions
There are possible solutions to the problem, but it’s important to mention that they will not be bulletproof. They can only reduce flakes. But if you need to have conditions in your test, it will never fully eliminate them.
Being explicit
One way you can fight flakes and random errors is by being explicit.
Imagine your site has multiple tests running that can ultimately alter the result of your E2E tests. In this case, you want to be explicit about which variation of your A/B test the user will receive whether it be by:
- Setting query params.
- Settings cookies or other local storage.
- Setting headers.
Callbacks
If you must, you can also conditionally query for elements using .then chains.
For example, you know for sure that one of two elements will be present on the page, but you don’t know which one. You are doing experiments between a banner and a popup.
We can use cy.get('body'), as body will always be present, and query for the necessary element to see if it is present:
cy.get('body')
  .then($body => {
      if($body.find('.banner').length) {
          return '.banner';
      }

      return '.popup';
  })
  .then(selector => {
      // The element will be found for sure
      cy.get(selector);
  });
Using fallbacks
You may also want to introduce error handling into your tests in the form of try-catch statements or in any other way to handle errors.
But this is the same as doing conditional testing; it’s just wrapped in a different package.
The truth is, that no matter what approach you take, your tests will not be 100% deterministic if you don’t know the state of your application. And having non-deterministic tests will lead to random red builds, anger, frustration, and a lot of wasted dev time. Therefore, you want to avoid having conditions in your test suite as much as possible.
Testing the carousel
With this in mind, let’s have a look into how you can conditionally test the carousel that we have on the homepage of Cypress.
For demonstration purposes, let’s say we know that when there’s no data, no carousel is rendered, and so there’s nothing to test.
Note that in a real scenario, you would mock the data for the carousel with a fixture to ensure its availability and make your test deterministic.
We’ve already looked into what kind of steps would be good to include as part of testing the carousel. If you remember from the Organizing Your Tests lesson, these are the following:
import {
    verifyCarouselPresence,
    clickOnNextButton,
    clickOnPreviousButton
} from '../steps/carousel'

it('Should have controllable carousels', () => {
    verifyCarouselPresence();
    clickOnNextButton();
    clickOnPreviousButton();
});
If we have a look into the carousel.js where the steps are exported from, we can see three different functions:
export const verifyCarouselPresence = () => {
... };

export const clickOnNextButton = () => { ... };

export const clickOnPreviousButton = () => { ... };
First, let’s define these steps, and then we will look into conditional testing.
Writing the steps for the carousel
To make the selectors easily configurable, let’s group them like this:
const selectors = {
    testimonials: '#testimonials',
    carousel: '.slick-list',
    track: '.slick-track',
    nextButton: '.slick-next',
    previousButton: '.slick-prev',
    activeSlide: '.slick-active'
};
First, we want to group the selectors we want to use. It should be grouped at the top of the file and inside an object for easy access. For the verifyCarouselPresence step, we use cy.get commands to verify their presence:
export const verifyCarouselPresence = () => {
    cy.get(selectors.testimonials).as('testimonials');

    cy.get('@testimonials').find(selectors.carousel).as('carousel');
    cy.get('@testimonials').find(selectors.track).as('track');
    cy.get('@testimonials').find(selectors.nextButton).as('nextButton');
    cy.get('@testimonials').find(selectors.previousButton).as('previousButton');
};
We are using aliases to make the rest of the steps more easily readable. To know what to test for the navigation, we need to know exactly how the carousel works. If we look into the DOM, we can see that at any given time, there is a div with a slick-active class.
The different divs also have indexes. The index with zero is the first slide, the index with one is the second, and so on. We can use this information to verify if the carousel navigated to the next slide when the button is being clicked:
// At page load, the index should be at 0. After clicking the next button, it should be 1.
export const clickOnNextButton = () => {
    cy.get('@testimonials')
        .find(selectors.activeSlide)
        .should('have.attr', 'data-index', '0');

    cy.get('@nextButton').click();
    cy.get('@testimonials')
        .find(selectors.activeSlide)
        .should('have.attr', 'data-index', '1');
};
Note that we are not reusing an alias for the active slide. This is because the active element is always different. If we were to store it in a variable, it would always give back the initially active element, not the currently active element. We can follow the same logic for the previous button:
export const clickOnPreviousButton = () => {
    cy.get('@previousButton').click();
    cy.get('@testimonials')
        .find(selectors.activeSlide)
        .should('have.attr', 'data-index', '0');
};
Making it conditional
So how exactly can we make this conditional? We can export another step that checks for the availability of the data (in our simple example, the availability of the slider).
export const checkDataAvailability = () => {
  return cy.get('body')
    .then($body => {
      if ($body.find(selectors.carousel).length) {
        return true;
      }

      return false;
    });
}
As discussed in the possible solutions, we can use the body to query for the carousel since body will always be present. If we find it, we can return true; otherwise, we can go with a false. Note that the query happens inside the then callback of the cy.get command. Also, make note that since we want to make use of the return values of this function, we also need to return the cy.get command itself. Let’s see how we can use this function in our test file:
import {
  ...
  checkDataAvailability
} from '../steps/carousel'

it('Should have controllable carousels', () => {
  // Since a promise is returned from `cy.get`, we want to call `.then`
  // The `true` / `false` value will be available in the argument of the callback
  checkDataAvailability().then(dataAvailable => {
    if (dataAvailable) {
      verifyCarouselPresence();
      clickOnNextButton();
      clickOnPreviousButton();
    }
  });
});
Importing this into our test file, we can change the spec to call this function (with a then callback), and do an if check to see if we truly want to execute the test steps for the carousel.
const selectors = {
    testimonials: '#testimonials',
    carousel: '.slick-list',
    track: '.slick-track',
    nextButton: '.slick-next',
    previousButton: '.slick-prev',
    activeSlide: '.slick-active'
};

export const checkDataAvailability = () => {
    return cy.get('body')
        .then($body => {
            if ($body.find(selectors.carousel).length) {
                return true;
            }

            return false;
        });
};

export const verifyCarouselPresence = () => {
    cy.get(selectors.testimonials).as('testimonials');

    cy.get('@testimonials').find(selectors.carousel).as('carousel');
    cy.get('@testimonials').find(selectors.track).as('track');
    cy.get('@testimonials').find(selectors.nextButton).as('nextButton');
    cy.get('@testimonials').find(selectors.previousButton).as('previousButton');
};

export const clickOnNextButton = () => {
    cy.get('@testimonials')
        .find(selectors.activeSlide)
        .should('have.attr', 'data-index', '0');

    cy.get('@nextButton').click();
    cy.get('@testimonials')
        .find(selectors.activeSlide)
        .should('have.attr', 'data-index', '1');
};

export const clickOnPreviousButton = () => {
    cy.get('@previousButton').click();
    cy.get('@testimonials')
        .find(selectors.activeSlide)
        .should('have.attr', 'data-index', '0');
};
The Test Runner
So far, we’ve only looked into how to deal with test cases, but we haven’t used the test runner. Let’s change that now and see how it can help us visualize our test and troubleshoot any failing test cases.
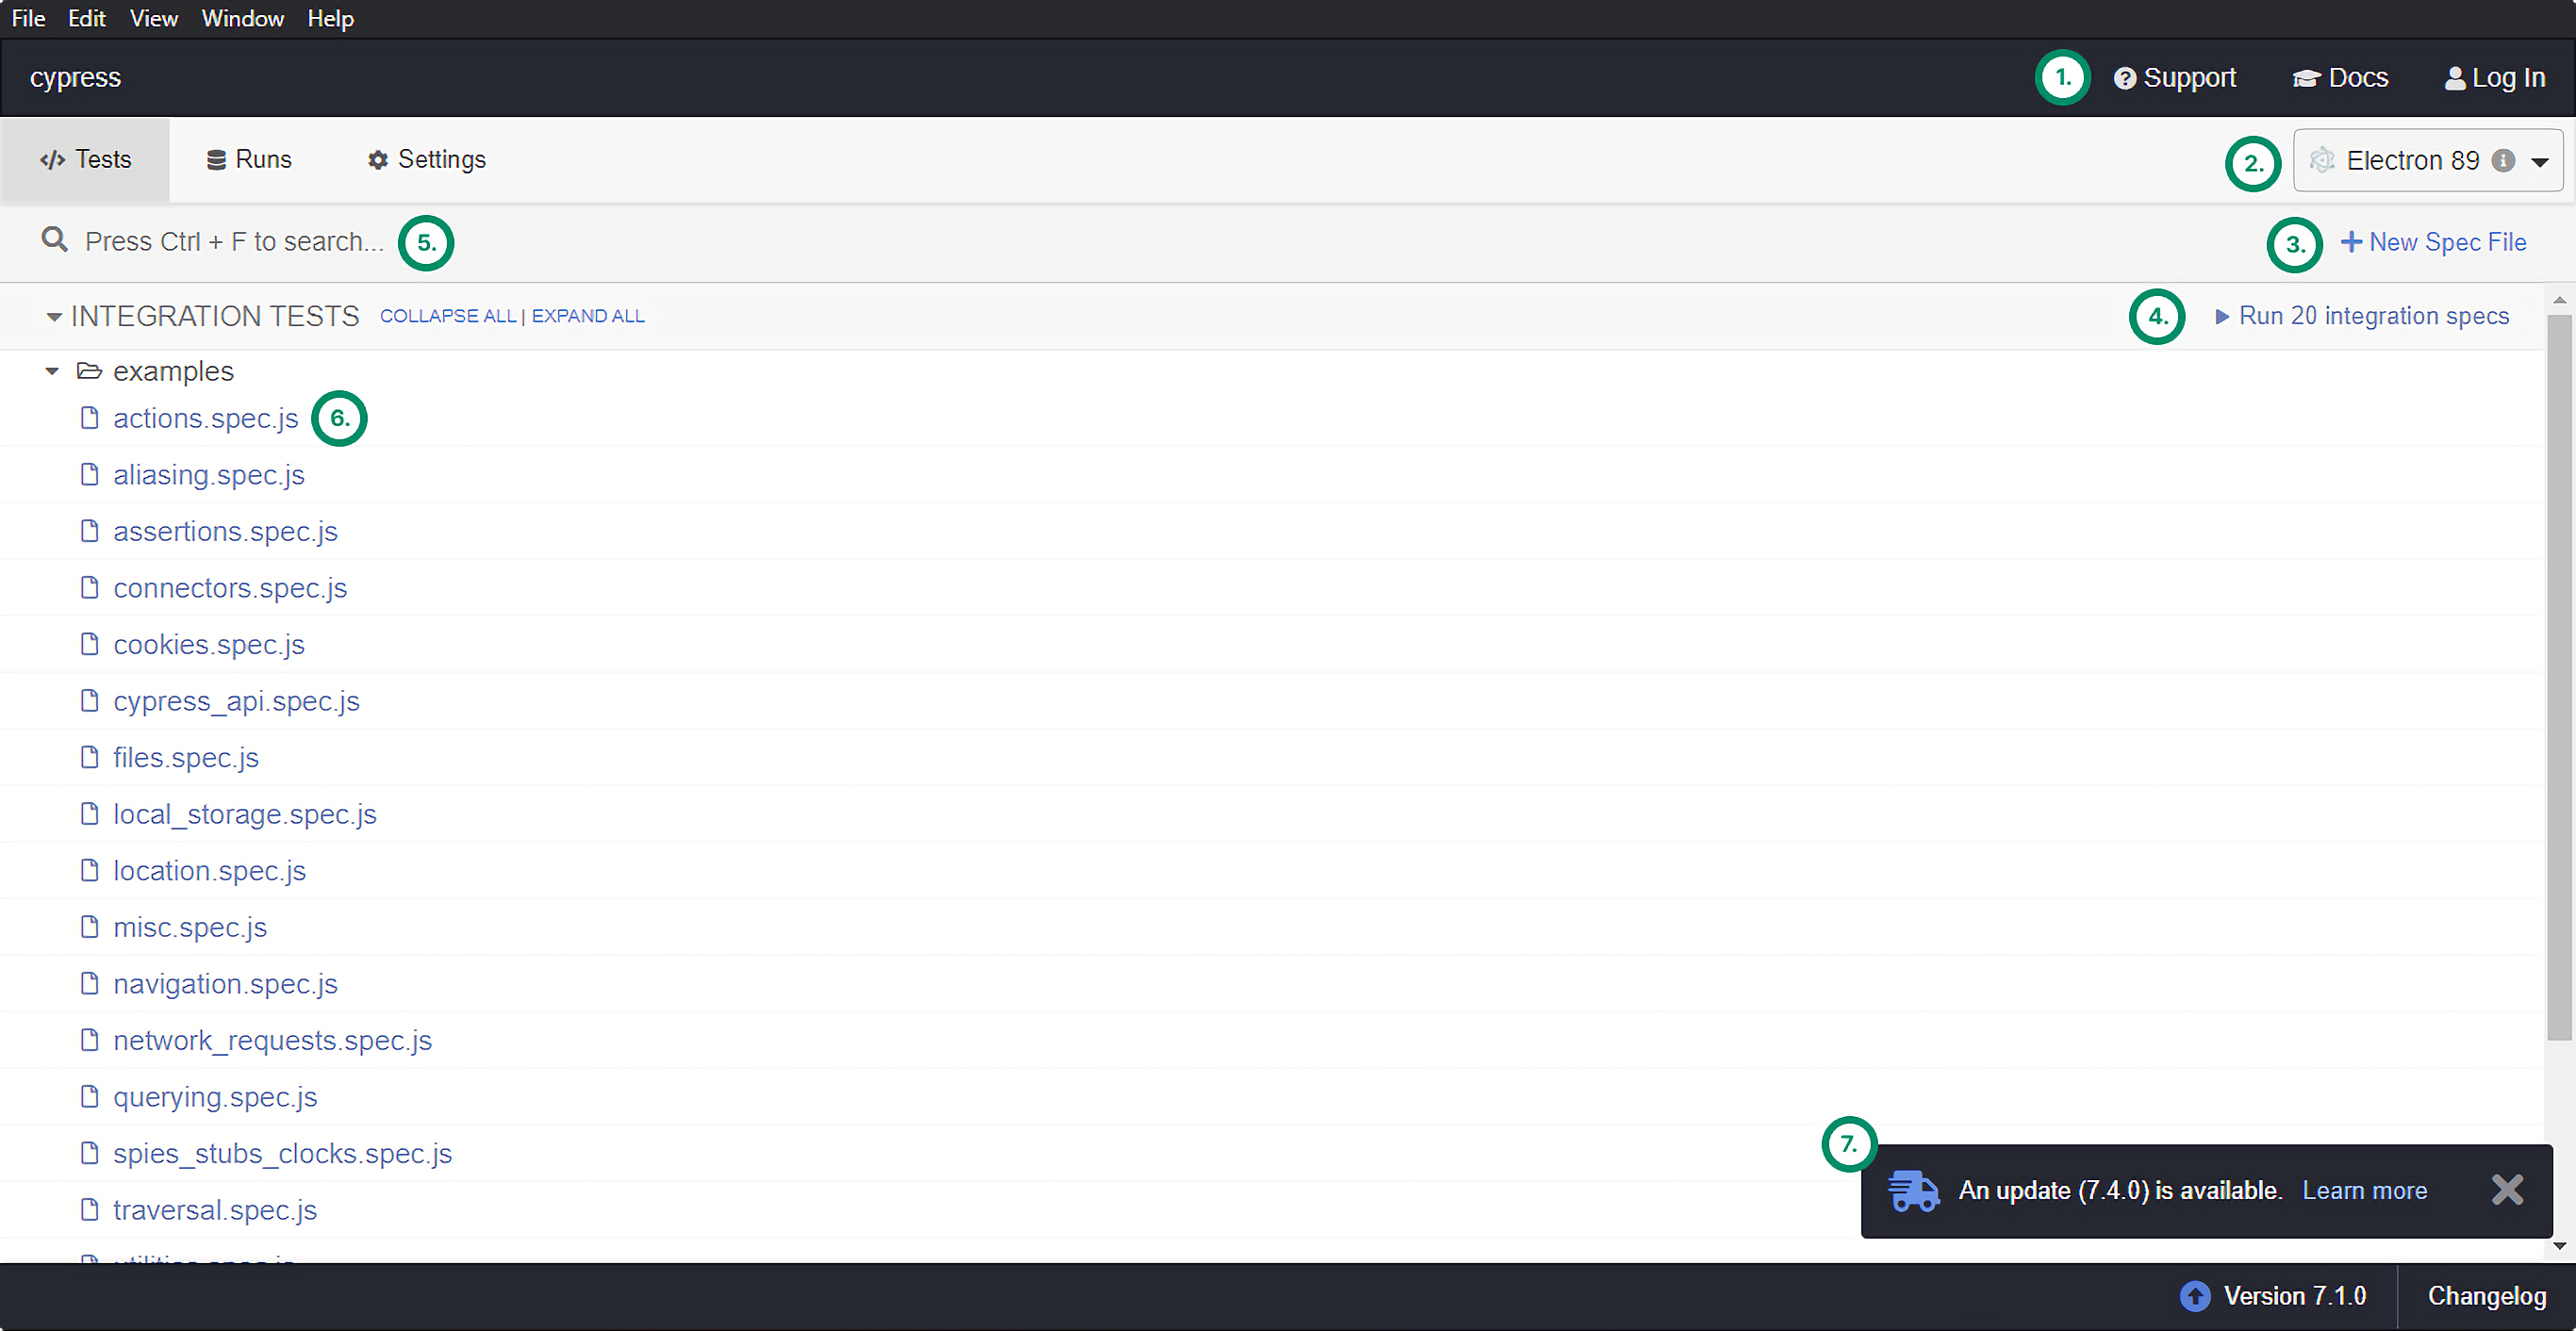
Let’s take a look at this picture and analyze what we have on the dashboard:
- At the top of the right-hand side corner, we have a “Support” and “Docs” button that can help us quickly navigate to the official site of Cypress, so we can get additional help.
- Below the “Support” and “Docs” buttons, we have a dropdown to select the browser we want to use for running our test cases. By default, it uses Electron, but Cypress will automatically detect available browsers on your system that you can use as well.
- Below that, we have the option to create a new spec file right from the test runner.
- Still on the right-hand side, we can run all integration specs at once by clicking the button.
- If you want to look for a single spec file but can’t find it, you can use the search bar at the top or hit Ctrl + F to search for a file.
- From the integration tests, we can click on any spec file to run it individually.
- At the bottom-right corner, Cypress will also alert us whenever a new version is available. Apart from the current version, this is where we can also reach the changelog
The Runs tab
If we switch over to the “Runs” tab, we can connect the Cypress Dashboard to see recorded test results
The Settings tab
Lastly, we have the “Settings” tab. This is where we can see our configuration settings.
The colors represent which option is set from where:
- Transparent for default values
- Blue for values set through cypress.json.
- Yellow for values set through cypress.env.json.
- Green for values set through environment variables.
- Red for values set through CLI arguments.
- Purple for values set through a plugin.
The automated browser
Now let’s have a look at the automated browser. Pick one of the test cases from the “Tests” step, and click on it to open the automated browser. Let’s go with the one we have been creating throughout this tutorial.
At the very top of our automated browser, we can see the status bar, which shows the following from left to right:
- A back button to all test cases
- The number of tests that have passed (in green), failed (in red), or skipped (in gray).
- The time it took for the specs to run.
- A button for disabling auto-scrolling.
- A button for re-running all tests in the spec file.
- The address bar with the URL of the site we are testing along with the screen dimensions underneath it.
You also have a crosshair icon next to the address bar. This opens the selector playground where you can dynamically use cy.get and cy.contains to select different elements on the page and quickly copy the selector to your test cases.
The command log
The command log will be our main indicator to see how tests are executed and what steps are passing or failing. Each command and assertion will be listed here, along with some additional pieces of information (such as network requests).
We can toggle test cases on and off by clicking on their name. If we go ahead and click on one of the commands inside the test case, it will log additional information about the command to the console, such as:
- The name of the command
- The element it yielded
- The number of elements it found
- The actual and expected values of an assertion And many more
Apart from logging useful information to the console, it will also take us back in time, so we can inspect the state of the application at the point and time of the command.
Retry-ability
One of the core features of Cypress is its ability to retry commands several times to reduce the likelihood of flakes. As discussed previously in the Consistent Results lesson, Cypress takes several measures to battle the most common causes of flakes, such as:
- Half-loaded application state
- Elements not available / covered / disabled
- Flakes caused by animations
Retrying commands and assertions
To battle all of this, Cypress retries both commands and assertions alike. Commands are Cypress calls that execute either a user behavior or it gets an element:
// The following are all commands
cy.get('.cta');
cy.get('input').type('This is a command');
cy.get('.cta').click();
On the other hand, assertions are anything that tests for a certain condition to be met, which is usually denoted by a cy.should command:
// The following are all assertions
cy.get('@cookiePolicyBanner').should('not.be.visible');
cy.get('@testimonials').should('have.attr', 'data-index', '0');
cy.get('@carousels').should('have.length', 2);
The reason for retries
When testing modern web applications, we will likely test asynchronous code. There are several reasons why a command might fail at first that otherwise would have passed with one or two retries:
- The DOM is not updated by the time the command runs.
- The response did not come back from the server in time.
- The state of the application did not reach its definitive state.
These are some of the reasons why Cypress will retry certain commands to further reduce the likelihood of flakes. If an assertion passes, the command finishes successfully. However, if the assertion fails, the command will be retried and the assertion after it as well. If the assertion fails again, the command will be retried again and the assertion as well. This keeps on going until the assertion passes or the command reaches a timeout, in which case the step fails.
When commands are not retried
However, not everything is retried in Cypress. Think of commands that can ultimately trigger a change in the state of your application, such as using cy.click. Retrying these commands could break your test, as you will end up with a state different from what you were about to test. Therefore, Cypress only retries commands that query the DOM, such as cy.get, cy.find, or cy.contains.
Using timeouts
For example, we can increase the time to retry. We can change the timeout for all commands. This can be done through cypress.json using the defaultCommandTimeout flag:
{
  // By default, this is set to 4000 milliseconds
  "defaultCommandTimeout": 4000
}
{ // By default, this is set to 4000 milliseconds "defaultCommandTimeout": 4000 }
We can also use it as a CLI flag:
cypress run --config defaultCommandTimeout=10000
Or, if we don’t want to override the default timeout globally, we can pass timeout to individual commands inside our test cases like so:
cy.get('button', { timeout: 10000 });
In this instance, Cypress will retry for up to 10 seconds before its timing out. We can also disable retry if needed by passing 0 to timeout, essentially telling Cypress to spend 0 milliseconds retrying.
Merge queries
Another way to make use of Cypress’ retry-ability is to merge commands together. Let’s say we want to test whether our banner contains the right text. We might go about this using the following commands:
cy.get('@banner').should('contain', 'The right text.');
However, we can combine the two into one and still force Cypress to retry by using the cy.contains command:
cy.contains('@banner', 'The right text');
Alternate between commands and assertions
To use retry to its full potential, it is also recommended to alternate between commands and assertions to avoid flakes. Let’s take a look at the following example:
const selectors = {
    testimonials: '#testimonials',
    carousel: '.slick-list',
    track: '.slick-track',
    nextButton: '.slick-next',
    previousButton: '.slick-prev',
    activeSlide: '.slick-active'
};

export const checkDataAvailability = () => {
    return cy.get('body')
        .then($body => {
            if ($body.find(selectors.carousel).length) {
                return true;
            }

            return false;
        });
};

export const verifyCarouselPresence = () => {
    cy.get(selectors.testimonials).as('testimonials');

    cy.get('@testimonials').find(selectors.carousel).as('carousel');
    cy.get('@testimonials').find(selectors.track).as('track');
    cy.get('@testimonials').find(selectors.nextButton).as('nextButton');
    cy.get('@testimonials').find(selectors.previousButton).as('previousButton');
};

export const clickOnNextButton = () => {
    // Note that if the slider starts automatically,
    // we can also use a regex matcher to test for multiple values.
    cy.get('@testimonials')
        .find(selectors.activeSlide)
        .should('have.attr', 'data-index')
        .and('match', /[0-1]/g);

    cy.get('@nextButton').click();
    cy.get('@testimonials')
        .find(selectors.activeSlide)
        .should('have.attr', 'data-index')
        .and('match', /[1-2]/g);
};

export const clickOnPreviousButton = () => {
    cy.get('@previousButton').click();
    cy.get('@testimonials')
        .find(selectors.activeSlide)
        .should('have.attr', 'data-index')
        .and('match', /[0-1]/g);
};
In this case, only the cy.find command will be retried. If cy.get fails to find @testimonials, the test will immediately turn red without any retry. Let’s change this to the following now:
const selectors = {
    testimonials: '#testimonials',
    carousel: '.slick-list',
    track: '.slick-track',
    nextButton: '.slick-next',
    previousButton: '.slick-prev',
    activeSlide: '.slick-active'
};

export const checkDataAvailability = () => {
    return cy.get('body')
        .then($body => {
            if ($body.find(selectors.carousel).length) {
                return true;
            }

            return false;
        });
};

export const verifyCarouselPresence = () => {
    cy.get(selectors.testimonials).as('testimonials');

    cy.get('@testimonials').find(selectors.carousel).as('carousel');
    cy.get('@testimonials').find(selectors.track).as('track');
    cy.get('@testimonials').find(selectors.nextButton).as('nextButton');
    cy.get('@testimonials').find(selectors.previousButton).as('previousButton');
};

export const clickOnNextButton = () => {
    // Note that if the slider starts automatically,
    // we can also use a regex matcher to test for multiple values.
    cy.get('@testimonials')
        .should('have.length', 1) // Add here
        .find(selectors.activeSlide)
        .should('have.attr', 'data-index')
        .and('match', /[0-1]/g)

    cy.get('@nextButton').click();
    cy.get('@testimonials')
        .find(selectors.activeSlide)
        .should('have.attr', 'data-index')
        .and('match', /[1-2]/g);
};

export const clickOnPreviousButton = () => {
    cy.get('@previousButton').click();
    cy.get('@testimonials')
        .find(selectors.activeSlide)
        .should('have.attr', 'data-index')
        .and('match', /[0-1]/g);
};
As noted before, this way, every query will be retried instead of it being only the last one. By adding an additional .should, we’ve increased the number of retries in our test case to reduce the likelihood of getting false failures.
Use .should with a callback
// Note that no cookie policy banner is shown in the virtual machine
// So instead, we can select the top banner on the page
const selectors = {
    cookiePolicyBanner: '[data-cy="top-banner"]',
    cookiePolicyBannerButton: '[data-cy="top-banner"] button'
};

export const verifyCookiePolicyPresence = () => {
    cy.get(selectors.cookiePolicyBanner).as('cookiePolicyBanner');
};

export const dismissCookiePolicy = () => {
    cy.get(selectors.cookiePolicyBannerButton).click();

    // All of the callback will be retried until it either passes or times out.
    cy.get('@cookiePolicyBanner').should($div => {
        expect($div).to.be.visible;
    });
};
Lastly, in case we need to retry a command that cannot be retried, it is recommended to create a .should callback off the first retry-able command like in the above example.
Using Debuggers
Cypress lets us debug code in various ways. As it runs in the same event loop, we can use the same tools we normally would, such as using the debugger keyword or using Developer Tools.
Debug in a familiar way
Because Cypress runs inside a browser, we have access to browser-specific objects, such as the document, the window, and the debugger.
We can use this keyword to stop the execution of test cases on the exact line where we add a debugger. However, note that if we try to debug one of our test cases in the following way, it won’t work:
cy.visit('https://cypress.io');
cy.injectAxe();

cy.get('@cookiePolicyBanner');

// Trying to stop code execution with the `debugger` keyword
debugger;
This is because Cypress works asynchronously, and enqueue commands to be executed later. In the example above, all of the commands will be scheduled, but by the time we hit the debugger keyword, the commands still haven’t been executed yet. This is why we need to change the above example into the following:
// Note that no cookie policy banner is shown in the virtual machine
// So instead, we can select the top banner on the page
const selectors = {
    cookiePolicyBanner: '[data-cy="top-banner"]',
    cookiePolicyBannerButton: '[data-cy="top-banner"] button'
};

export const verifyCookiePolicyPresence = () => {
    cy.get(selectors.cookiePolicyBanner).as('cookiePolicyBanner');
};

export const dismissCookiePolicy = () => {
    cy.get(selectors.cookiePolicyBannerButton).click();

    // We need to use the debugger inside a callback
    cy.get('@cookiePolicyBanner').then($div => {
        debugger;
    });
};
We need to chain a .then callback after the command to ensure the command indeed finished the execution. As soon as it does, it enters the .then callback and hits the debugger keyword at the right time.
Note that you need to open the Developer Tools by right-clicking on the application and clicking on “Inspect Element.” Once DevTools is open, we can inspect the state of the application to debug any arising issues.
The Developer Tools
Since the test runner runs inside an actual browser, we also have access to Developer Tools. This helps us troubleshoot code and better understand why certain tests may fail. Not only that, but if we click on one of the executed commands inside of the command log, we get various information about it logged to the console.
Using Cypress’ debug command
Apart from the familiar ways of debugging, Cypress also has some built-in commands specifically made for debugging to help us troubleshoot problems. One of these commands is cy.debug.
To use the .debug command, you simply need to call it off from another command or by itself. If it is called from another command, it will return with the same subject it was given. Take the following as an example:
// Note that no cookie policy banner is shown in the virtual machine
// So instead, we can select the top banner on the page
const selectors = {
    cookiePolicyBanner: '[data-cy="top-banner"]',
    cookiePolicyBannerButton: '[data-cy="top-banner"] button'
};

export const verifyCookiePolicyPresence = () => {
    cy.get(selectors.cookiePolicyBanner).as('cookiePolicyBanner');
};

export const dismissCookiePolicy = () => {
    cy.get(selectors.cookiePolicyBannerButton).click();

    // We can attach a `.debug` command to the `cy.get` command
    cy.get('@cookiePolicyBanner').debug();
    cy.get('@cookiePolicyBanner').debug(false);
};
If you attach the .debug command to the @cookiePolcyBanner, it will stop the code execution when it gets the element, and you will also get the command logged to the console:
Calling .debug on its own
If we call cy.debug on its own, it will either return with the previous command or if there’s no previous command, it will simply return with undefined. This command essentially sets a debugger keyword for us.
cy.get('button').click();
cy.debug();
n the example above, cy.debug will return information on the .click command that is preceded by it. If you call it without any other command preceding it, it will still stop code execution but will log undefined to the console because there’s no previous command to reference.
Pausing commands
To use cy.pause, we can chain it off from other Cypress commands or call it on its own. We can also chain other commands from it:
cy.get('@cookiePolicyBanner').pause(); // Pause after the `get` command is executed
cy.pause().get('@cookiePolicyBanner'); // Pause before the `get` command is executed
In the status bar, indicating that the test is currently paused, we also get a button for:
- Resume: Resume the execution. This will step over to the next command after cy.pause and continue the execution from there.
- Next: Step over to the next command following cy.pause. This will only execute the following command. We can keep on clicking “Next” until all commands have been executed one by one.
import {
    verifyCookiePolicyPresence,
    dismissCookiePolicy
} from '../steps/cookiePolicy'

import {
    verifyCarouselPresence,
    checkDataAvailability
} from '../steps/carousel'

describe('Homepage', () => {
    before(() => {
        cy.visit('https://cypress.io');
    });

    // Here we can step through individual commands.
    it('Should show dismissible cookie policy banner', () => {
        cy.pause();
        verifyCookiePolicyPresence();
        dismissCookiePolicy();
    });

    // Execution will continue as normal. `cy.pause` does not affect the next blocks.
    it('Should have controllable carousels', () => {
        checkDataAvailability().then(dataAvailable => {
            if (dataAvailable) {
                verifyCarouselPresence();
            }
        });
    });
});
Other ways of debugging
As we have talked about earlier, flakes are when tests fail for apparently no reason, making our test cases indeterministic. Of course, nothing happens without a reason. Often, however, the failure is due to external forces that we cannot control. Still, we can do preventative measures to avoid falling victim to flakey tests.
As discussed in the “Consistent Results” lesson, there are some common causes of flakes that Cypress already internally handles. The question is, if we still have a failure, what are the ways to debug it and then address the failing step?
There are several measures we can take to help us more easily debug flakes more easily and pinpoint the location of the problem much faster. Here are some steps we can go through in case the inevitable happens.
Resources
- The mission of Cypress: https://docs.cypress.io/guides/overview/why-cypress.html#Our-mission
- Cypress Documentation: https://docs.cypress.io/
- Official Roadmap: https://docs.cypress.io/guides/references/roadmap