React
Editable content for any react project
Context
During the years, while interacting with my clients a question shows up more than one would expect: *How can I manually change the text on page X * or I love it, but I just want the font a little bit smaller.
For react applications the answer is most likely: NO. But it doesn't have to be. In this article, we will provide our Client with some limited powers over the project.
What is NEXTjs and why we need it
Next.js was created on top of React to build an easy-to-use development framework. It was developed by Vercel (formerly Zeit) and makes use of many of the popular features of React. Right out of the box, Next.js provides things like pre-rendering, routing, code splitting, and webpack support. For more on Next.js, check out the official Next.js documentation.
Offering a bunch of optimisations by default, is easy to understand why it became really fast really popular among React developers. There is a small learning curve learning Next.js, but even developers new to the world of frontend can get up and running relatively quickly without having to worry about the boilerplate or basic optimisations. Next.js offers a more relaxed way of building a new project, providing a different experience than React.
Next not only provides support for SSR (server-side-rendering) but allows us to create our local API where we can interact with our files.
Next.js file structure
The basic structure of a Next project will look similar to this. For more visit the official Next.js documentation.
/root.next/src/Button/pages/api/api_route.jsx_app.jsxindex.jsxabout.jsxpublic/favicon.icoheader.png.envnext.config.jspackage.jsonREADME.md
-
src will hold all your custom components.
-
pages is a special folder where each page is associated with a route based on its file name. Example: If you create pages/about.js that exports a React component like below, it will be accessible at /about.
-
public will be the best place to have static elements like pictures.
-
_app.jsx is used to initialize pages.
You can override it and control the page initialization. Which allows you to do amazing things like:
- Persisting layout between page changes
- Keeping state when navigating pages
- Custom error handling using componentDidCatch
- Inject additional data into pages
- Add global CSS
-
api is another special folder that will create a Rest API associated with the file name. We can use this to make our life easier and so we won't need to create a different project for the API.
Code structure
Now that we got a bit familiar with Next.js and what it can do, let's have a look at how our application is working. The code for this presentation can be found at this link
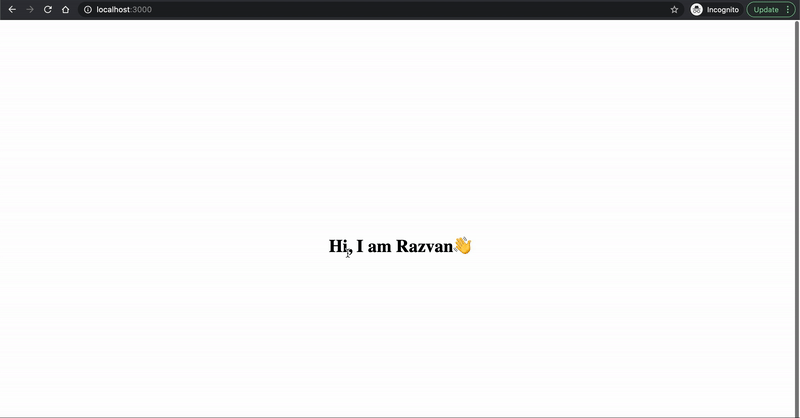
To keep it short, we will create on Frontend just a simple page with text that can be changed once we click on it. Initially, it should look like this:

The page folder will contain our homepage. Because we will want to provide the editing functionality in multiple parts of our project (probably some text should not be editable), we will create a custom component that will handle the editing logic.
Go to src and create a new file named EditableText.js. This component will accept a children property, that will contain the text (or text elements like a Paragraph or a Header etc), an id that should be unique per file and the fileUrl.
FileUrl together with id will be needed to identify the proper element to update the text. Sadly it has to be hardcoded when we are coding the component but is a small price to pay.
import React from "react";const EditableText = ({ children, fileUrl, id }) => {return (<span>{children}</span>);};export default EditableText;
During my tests, I found one editor that have a good parse of the HTML contents inside and provides the user with more granular interactions if needed. This editor is called kendo-react-editor, so let's import it and start playing a bit.
npm i @progress/kendo-drawing @progress/kendo-react-buttons @progress/kendo-react-dialogs @progress/kendo-react-dropdowns @progress/kendo-react-editor @progress/kendo-react-inputs @progress/kendo-react-intl @progress/kendo-theme-default
First of all, we will have to add the global styles, either do it in the root file or we can create a file inside pages/_app.js, as we already discussed this is a special file that will be wrapped around all pages in our app.
import "@progress/kendo-theme-default/dist/all.css";function MyApp({ Component, pageProps }) {return (<div className="container"><Component {...pageProps} /></div>);}export default MyApp;
Going back to our EditableText we need to define all buttons that will be displayed in the editor and the kendo editor component. For more details on how to customize the editor please visit the official documentation.
On top of that, we will need renderToStaticMarkup from react-dom/server to render out the children elements into static markup. This object will be served into the editor so we can have the most accurate representation inside the editor.
+ import React, { useRef } from 'react';+ import { Editor, EditorTools, EditorUtils } from "@progress/kendo-react-editor";+ import { renderToStaticMarkup } from "react-dom/server";+ const {+ Bold,+ Italic,+ Underline,+ Strikethrough,+ AlignLeft,+ AlignCenter,+ AlignRight,+ ForeColor,+ AlignJustify,+ Indent,+ Outdent,+ OrderedList,+ UnorderedList,+ Undo,+ Redo,+ FontSize,+ FormatBlock,+ Link,+ Unlink,+ } = EditorTools;const EditableText = ({ children, fileUrl, id }) => {+ const defaultContent = renderToStaticMarkup(children);+ const editorRef = useRef(null);return (+ <><span>{children}</span>+ <Editor+ tools={[+ [Bold, Italic, Underline, Strikethrough, ForeColor],+ [AlignLeft, AlignCenter, AlignRight, AlignJustify],+ [Indent, Outdent],+ [OrderedList, UnorderedList],+ FontSize,+ FormatBlock,+ [Undo, Redo],+ [Link, Unlink],+ ]}+ contentStyle={{ height: 160, width: "100%" }}+ defaultContent={defaultContent}+ ref={editorRef}+ />+ </>);};
As we described initially we want the editor to activate when we click on the text, so let's add some state.
const editorRef = useRef(null);+ const [showEdit, setShowEdit] = useState(null);...+ <span onClick={() => setShowEdit(true)}>{children}</span>+ {showEdit && <Editor.../>+ }
At this point you can start improvising, most likely having the editor jump in after our text element is not the best visual representation. Something more appropriate would be to place it in a modal, eventually, we could have a draggable modal where the user can move it around so he can see the actual content. A nice library that could help us could be (react-modal-resizable-draggable)[https://www.npmjs.com/package/react-modal-resizable-draggable].
I will let you improve it and make it more suitable for the client. Just because the preview in the text editor won't give us a 100% feel on how the change will look on the page, we can add a little preview button.
Install html-react-parser to convert an HTML string from the text editor to one or more React elements.
npm install html-react-parser
+ import parse from "html-react-parser"...+ const [previewValue, setPreviewValue] = useState(null);...+ const preview = () => {+ const { view } = editorRef.current;+ const nodeHtml = parse(EditorUtils.getHtml(view.state));+ setPreviewValue(nodeHtml);+ };...<span onClickCapture={() => setShowEdit(true)}>+ {previewValue ? previewValue : children}</span>...+ <div className="k-button-group button-group">+ <button className="k-button k-button-icontext" onClick={preview}>+ Preview+ </button>+ </div>
The preview function will be pretty simple. Using the EditorUtils from kendo-react-editor we can extract the HTML elements and save them to state. Once in state, we can simply display them instead of the initial content.

The visual side is done 🎉, but we still have work to do. The next stop is to get the text from the editor and send it back to the API to update our file.
For this, we will need axios to make our calls to the rest API and react-element-to-jsx-string to change a ReactElement into the corresponding JSX string.
npm install axios react-element-to-jsx-string
+ const save = () => {+ const { view } = editorRef.current;++ // Parse the editor value to html and then to React nodes+ const nodeHtml = parse(EditorUtils.getHtml(view.state));++ let jsxHtml = "";+ if (nodeHtml && nodeHtml.length > 0) {+ nodeHtml.forEach((node) => {+ jsxHtml += reactElementToJSXString(node);+ });+ } else {+ // Change the React nodes to JSX text+ jsxHtml = reactElementToJSXString(nodeHtml);+ }++ // Create body and make request+ const body = {+ html: jsxHtml,+ fileUrl,+ id,+ };++ axios+ .post("/api/update", body)+ .then(() => {++ setShowEdit(false);+ })+ .catch((err) =>+ console.error("We encountered an error while saving the file:", err)+ );+ setPreviewValue(false);+ };...+ <button className="k-button k-button-icontext" onClick={save}>+ Save+ </button>
The Save function needs to collect the content of the editor, the same way we did with the preview function.
At this point, the content in the editor can be of two types. A single line will be translated as one node object and multiple lines that will be returned in an array of objects. Having a basic check if nodeHtml is an array or a simple object we can parse all the contents in the editor to string. reactElementToJSXString will give us the desired output a JSX string for the component.
<h1><spanstyle={{fontSize: 'xx-large'}}>Hello, I am Razvan</span>👋</h1>
Now that we have the parsed string we can send it to our API using a POST request. It will allow us to pass a body element formed by the parsed HTML object, the fileUrl and ID of the changed text, that will be used to target the right segment in the code to be updated. At this stage, we can also improve it by adding a nice loader over the button until the api response gets back. In our case when we are getting a good response from the API we will just close the modal.
Backend structure
Altho it sounds scary it is pretty straight forward. Before we jump into code again let's take a minute and understand what our function needs to accomplish.
Receiving some HTML, a folder path and an ID, our function needs to open the file that matches the provided path, find the node with the ID and update the HTML contents.
import fs from "fs";export default (req, res) => {const { fileUrl, id, html } = req.body;let file = null;res.setHeader("Content-Type", "application/json");// Try to read the filetry {file = fs.readFileSync(fileUrl, "utf8");} catch (err) {res.statusCode = 500;res.json({message: "Oops!! We got an error reading the file!",error: err,});return;}res.statusCode = 200;res.json({ message: "Success" });};
Req and Res are the basic parameters described in an (express route)[https://expressjs.com/en/guide/routing.html]. Req stands for the request, we will be able to access information about the request coming from Frontend; the most common use it to get the req.body or req.params. Res denotes the response, it contains the functions to send back a response to the frontend. In this example, we will be using res.json to return a json object with success or an error.
As described earlier, the first step is to read the file. Fs is a nice package allowing us to interact with the file system. As a good practice, we will wrap it in a Try/Catch block just in case we get an error. The file might not exist or the wrong permissions to read/write the file are just a few examples. If we are getting an error we will just send back a JSON with a nice error message, letting our frontend app know that something went wrong.
+ import { parse } from "node-html-parser";...+ const findAndUpdateNode = (node, id, value) => {+ // NodeType 1 is an HTMLElement+ if (node.nodeType !== 1) {+ return;+ } else if (node.rawAttrs && node.rawAttrs.includes(id)) {+ // If we found the id then replace the content+ node.set_content(value);+ return;+ } else {+ // Go through all the childNodes until we find the id+ node.childNodes.forEach((childNode) =>+ findAndUpdateNode(childNode, id, value)+ );+ }+ };...+ // Parse the file and update the element.+ const root = parse(file);+ findAndUpdateNode(root, id, html);res.statusCode = 200;res.json({ message: "Success" });
Now that we have access to the file contents we need a way of finding the proper node to edit. First of all import node-html-parser to parse the content of the file and pass it to our custom function.
By checking the type of each node, we can see if they are HTML node or other types. As expected we will check for only the HTML node and have a check if we find the element with the ID we specified. If the selected node does not have an ID or is not the right one, we will go in a recursive call for each child that our node has.
If we set the ID and File path properly, eventually our function will get to the right node. By using the setter function node.set_content(value) we can update the node value with the exact html object we sent from the frontend.
// Parse the file and update the element.const root = parse(file);findAndUpdateNode(root, id, html);+ // Need to write the file now.+ try {+ fs.writeFileSync(fileUrl, root.toString());+ } catch (err) {+ res.statusCode = 500;+ res.json({+ message: "Oops!! We got an error writing the file!",+ error: err,+ });+ return;+ }
The hard part is done. The last thing is to save the file and go celebrate. Just like we did when we opened the file, now we will write in the file. writeFileSync will accept the path of the file and the value. Since we parsed the contents of the file and changed the nodes, we need to convert it back to string, root.toString().
Wrapping our function in the same Try/Catch to prevent unwanted errors.
Perfect now our application should be working and our script will always save the content so that even if we refresh the page, our changes will remain saved.
For any improvements or problems with the project, you can find the code on my (GitHub page)[https://github.com/razvan-soare/edit-content]. I will be more than happy to hear your feedback.
Thank you for reading.